the curFET + iron microphone preamplifier
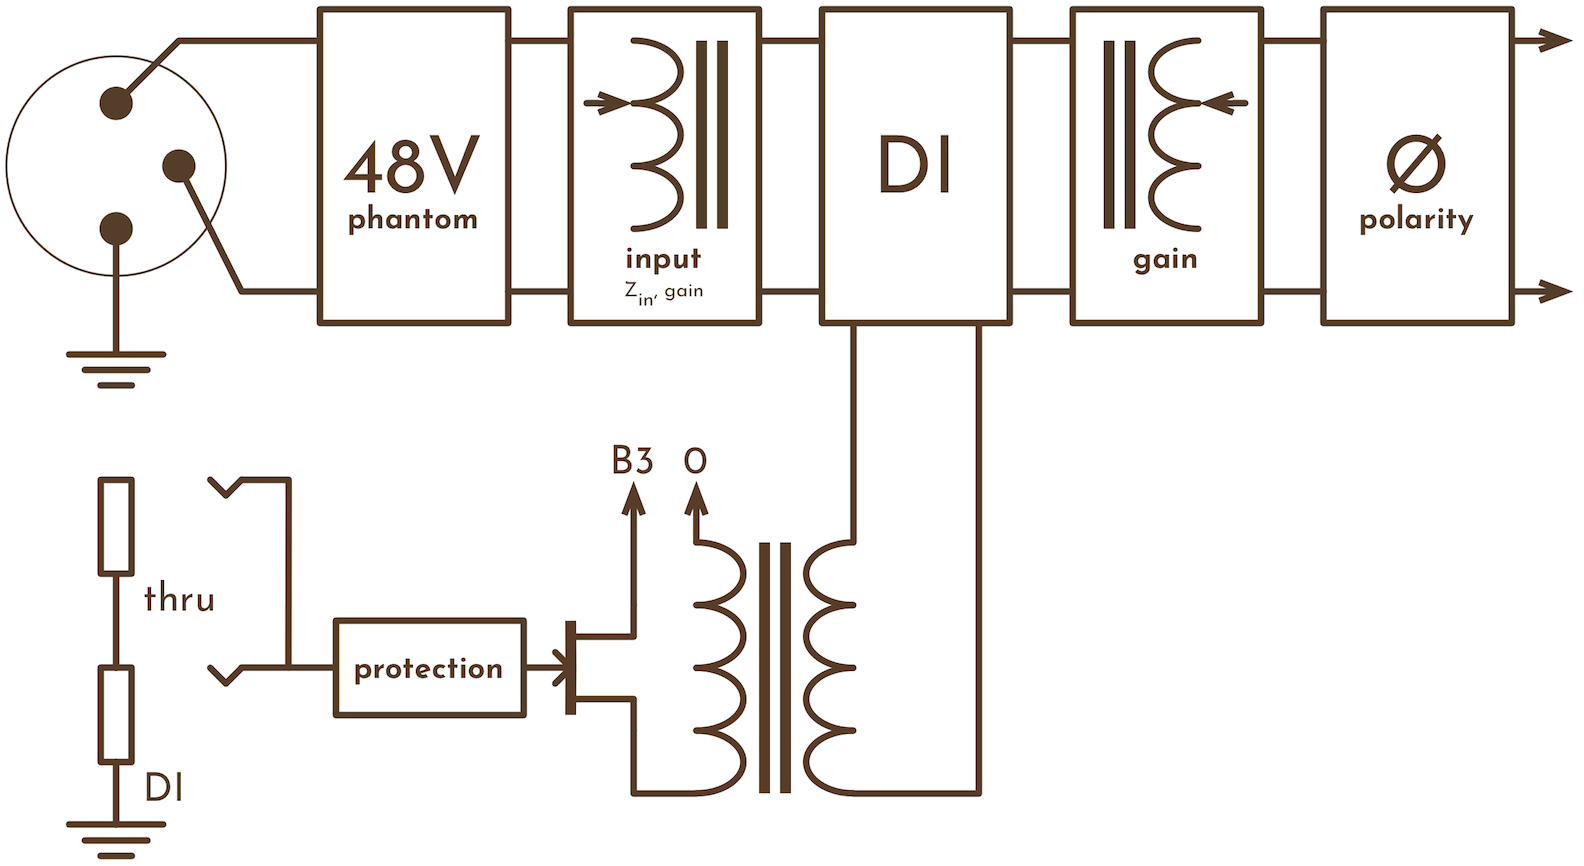
The first tarragona audio product, currently in development, is a microphone preamplifier. Already curious? That’s what this page is for. Let’s start off with a simplified circuit diagram…

…and a quick overview of the preliminary specs and traits:
- signal circuit design featuring no op amps, no loop feedback, no printed circuit boards, no capacitors*
- plenty of iron: more than a dozen (auto)transformers and inductors, just about all of them custom designed & made
- four triple‐regulated power supplies, which sonic impact is kept out of the signal path with inductors
- un‑mechanical sound; the energy that underpins the music and performance is conserved at every stage, flowing freely
- gain, XLRin: +78dB to -52dB in 2dB steps; DI: +60 to -52dB
- +24dBu capability: XLR (line) input, DI, output
- ten input impedances, from 10k (line) to 200 Ohm
- sweepable, second‐order rumble filter, 20–320Hz in 1⁄3‑octave steps
- rotary controls: input, gain, filter frequency, volume
- switches: phantom, DI, DI protection, polarity, rumble filter, booster, mute
* there is a capacitor in the seldom‐used DI protection circuit.
Now, I will go through each section in detail, starting with…
the input circuit

We start at the top‑left and will work our way down the signal path. Right after the input XLR there is the phantom supply. Switching it on/off nicely ramps the 48 volts up/down, avoiding alarming noises. The power is supplied to the microphone via inductors, not the usual resistors. This means there is no energy‐draining load on the signal.
The second module is the rotary input control, which sets the characteristic input impedance and gain of transformer windings. Below is an overview of the ten available settings—
| impedance | gain |
|---|---|
| 10k (line) | unity |
| 7k | +2dB |
| 5k | +4dB |
| 3k | +6dB |
| 2k | +8dB |
| 1250 | +10dB |
| 800 | +12dB |
| 500 | +14dB |
| 300 | +16dB |
| 200 | +18dB |
In contrast with a simple pad switch, the input control is—when used with the gain and booster controls—a flexible way to interface with a wide variety of sources. This preamp works with whisper‐quiet ribbons, dynamic mics pumping out several volts (e.g. sm57 close‐miking a jet engine) and line level (+24dBu) input. The input control can also be used for experiments with input impedance and input transformer headroom. Go on, explore the associated sonic shadings.
dogleg detour
Third in line is the DI switch, which switches between the XLR input chain and the DI circuit. The DI has a straight‐wired ‘thru’ jack, so that plugging your instrument/source also into an amp, effects, &c. is a no‐brainer. There is a switchable protection circuit (warning: this contains a capacitor) for those times you plug in something unorthodox. Finally, a jFET source‐follower driving a transformer offers MegaOhm Zin, unity gain, line level (+24dBu) handling and freedom from ground loops.
The fourth input module is the gain control; a magnetic attenuator (autotransformer) which can be set in 2dB steps from unity to -46dB. No surprises: here you control the level going into the amplifying circuit, the SNR and the headroom.
Finally, the input circuit has a polarity switch. Wrapping up, the complete XLR input chain is passive, balanced and only consists of iron—inductors, (auto)transformers—and switches. The signal touches no capacitors, or resistors; musical energy is fully preserved and delivered to…
the amplification circuit

First, an overview: from left to right we see the input transformer and three active amplification stages which consisting of a jFET and a transformer—the curFET stages. What these three single‐ended stages have in common is modest gain (20dB) and a special circuit topology that together deliver the linear and un‑mechanical sound that transformer‐loaded, single‐ended triodes are known for.
The difference between the stages is that the first two are designed for low noise and the handling of delicate signals, whereas the last one is designed for graciously delivering line level (+24dBu) signals with an output impedance of 150 Ohm.
cut and insert
The booster switch configures the circuit either as a two‐stage amplifier (40dB of gain) or a three‐stage (60dB). Combine this with the input and gain controls, and the preamp gain—XLR input to final curFET stage output—can be set in 2dB steps from +78dB to -6dB (DI: +60 to -6dB).
The remaining module is the first half of the rumble filter. It has an in/out switch, a second‐order slope and can be set from 20 to 320Hz in 1⁄3‑octave steps. It is completely implemented using inductors, no capacitors at all.
caps, no caps
This is the moment to talk about power supplies. All four supplies in this preamp (B1, B2, B3 for the DI, phantom) are each triple‐regulated for low noise; a brute‐force scheme similar to 1960s german broadcast (rundfunk) modules. Then… something special: I couple each supply through an inductor to the audio circuit, to keep the sonic signature of the regulators and capacitors out of the audio signal.
It is so liberating that I don’t have to pick capacitor types for the signal path. There ain’t any, so I am not forced to decide to add zing, mush, edge, or smokiness to your music.
Summing up, the amplification circuit is puristic and single‐ended. At its core are four transformers and three jFETs. The musical energy flows through a single, unambiguous path and is released into…
the output circuit

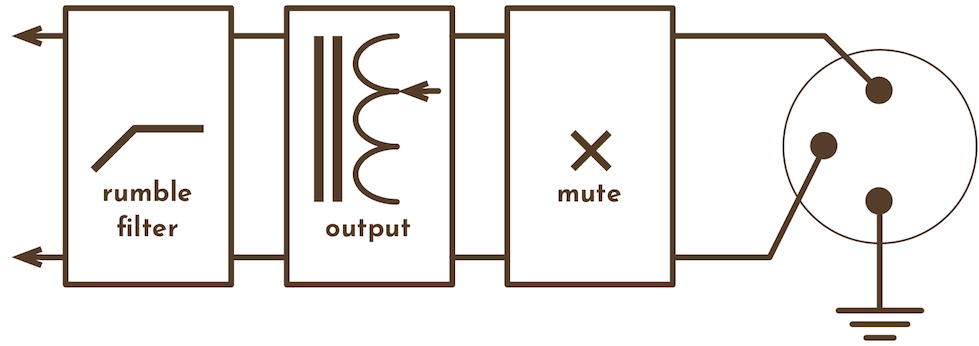
This part of the preamp is also completely passive, balanced and also only consists of iron and switches. It starts off with the second half of the rumble filter, making it second‑order.
This is followed by the output attenuator, which has the same spec as the gain control: a magnetic attenuator which can be set in 2dB steps from unity to -46dB. This extends the preamp gain range quoted above (‘…to -6dB’) further down, to -52dB. Paradoxically, this preamp can take a line level input, make a microphone level signal out of it and feed another preamp.
The beauty of a magnetic attenuator is that it can be placed right at the output of an amplifier, so you can drive the whole amplifier as much as you wish. And it works without inhibiting output drive capability. On the contrary, the more you turn it down, the more drive you get and the lower the output impedance.
three clicks to heaven
I guess it comes as no surprise that the input, gain and output controls were designed to be used together to shape the character of the preamp. Whenever you don’t need the full 78dB of gain, you have choices where it comes to input impedance, transformer & amplifier headroom, and output drive. All three controls sport 2dB steps throughout, so one click up/down of one control is easily volume‐compensated by a click down/up from either of the other two.
The final control before the output XLR is the mute switch.
postscript
And there you have it. Development is ongoing and the overall design is still subject to change. I am planning to make the first one a desktop unit; with all that iron it’s going to be a full & heavy box. If you do find all of this fascinating, why not drop me a line?